mirror of
https://github.com/rvtr/wiki.git
synced 2025-10-31 06:31:13 -04:00

100 lines
5.2 KiB
Markdown
100 lines
5.2 KiB
Markdown
---
|
||
lang: zh-CN
|
||
layout: wiki
|
||
section: twilightmenu
|
||
category: installing
|
||
title: 安装(3DS)
|
||
long_title: 安装 TwiLight Menu++(3DS)
|
||
description: 如何在 Nintendo 3DS上安装 TWiLight Menu++
|
||
tabs:
|
||
-
|
||
working-camera: 摄像头可用
|
||
non-working-camera: 摄像头不可用
|
||
manual: 手动安装
|
||
---
|
||
|
||
你首先需要在你的 3DS 安装好自定义固件(Custom Firmware,CFW),如果没有,请按照 [3ds.hacks.guide](https://3ds.hacks.guide) 的步骤来安装自定义固件。
|
||
{:.alert .alert-info}
|
||
|
||
{% capture tab-working-camera %}
|
||
1. 启动 FBI 并选择 `Remote Install`(远程安装),再选择 `Scan QR Code`(扫描二维码)
|
||
1. 扫描这个二维码来安装最新版本的 [Universal-Updater](https://github.com/Universal-Team/Universal-Updater)<br> 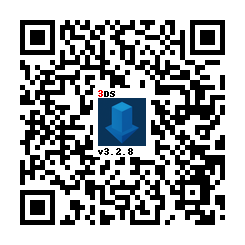
|
||
1. 退出 FBI 并启动 Universal-Updater
|
||
- 如果它没有出现在主菜单上,重启你的 3DS
|
||
1. 在应用列表中找到 TWiLight Menu++,如果找不到它,可以使用侧边栏上的第 3 个按钮进行搜索
|
||
- 它的图标长这样:
|
||
1. 按 <kbd class="face">A</kbd> 键,或是点击侧边栏中的下载图标并选择 `TWiLight Menu++` 来安装它
|
||
- 这需要一些时间
|
||
{% endcapture %}
|
||
{% assign tab-working-camera = tab-working-camera | split: "////////" %}
|
||
|
||
{% capture tab-non-working-camera %}
|
||
1. 下载最新的 [`Universal-Updater.cia`](https://github.com/Universal-Team/Universal-Updater/releases/latest/download/Universal-Updater.cia)
|
||
1. 将 `Universal-Updater.cia` 文件放置在你 SD 卡的任意位置
|
||
1. 在你的 Nintendo 3DS 上启动 FBI
|
||
1. 在 FBI 中,进入你刚才粘贴了 `Universal-Updater.cia` 文件的地方
|
||
1. 选择 `Universal-Updater.cia`,然后点击“Install & Delete”(安装并删除)
|
||
1. 退出 FBI 并启动 Universal-Updater
|
||
- 如果它没有出现在主菜单上,重启你的 3DS
|
||
1. 在应用列表中找到 TWiLight Menu++,如果找不到它,可以使用侧边栏上的第 3 个按钮进行搜索
|
||
- 它的图标长这样:
|
||
1. 按 <kbd class="face">A</kbd> 键,或是点击侧边栏中的下载图标并选择 `TWiLight Menu++` 来安装它
|
||
- 这将会需要一段时间
|
||
{% endcapture %}
|
||
{% assign tab-non-working-camera = tab-non-working-camera | split: "////////" %}
|
||
|
||
{% capture tab-manual %}
|
||
|
||
If you use a Windows edition which contains Windows Defender, it'll detect the `.7z` file as a Trojan due to a false positive. To fix the false positive, ensure Windows Defender is up to date.
|
||
{:.alert .alert-warning}
|
||
|
||
1. 下载最新的 [`TwiLightMenu-3DS.7z`](https://github.com/DS-Homebrew/TWiLightMenu/releases/latest/download/TWiLightMenu-3DS.7z)
|
||
1. 解压 `TWiLightMenu-3DS.7z`
|
||
1. 将 `_nds` 文件夹复制到 SD 卡的根目录下
|
||
1. 将 `BOOT.NDS` 文件复制到 SD 卡的根目录下
|
||
1. 将 `roms` 文件夹复制到 SD 卡的根目录下
|
||
1. 将`.cia`文件复制到SD卡的根目录下
|
||
1. 在 3DS 上使用 FBI 安装 CIA 文件
|
||
{% endcapture %}
|
||
{% assign tab-manual = tab-manual | split: "////////" %}
|
||
|
||
### 安装
|
||
|
||
{% assign tabs = tab-working-camera | concat: tab-non-working-camera | concat: tab-manual %}
|
||
{% include tabs.html index=0 tabs=tabs %}
|
||
|
||
### 访问烧录卡内容
|
||
|
||
烧录卡是一种可插入游戏卡插槽的东西,包含一个 microSD 卡插槽。 如果您没有烧录卡,可以无需继续阅读本指南。
|
||
{:.alert .alert-warning}
|
||
|
||
#### 如果您有 R4(i) Ultra
|
||
|
||
1. 要使用烧录卡固件运行游戏,请从[本指南](installing-flashcard)的`使用烧录卡固件运行游戏`章节开始阅读
|
||
- 您可以放心地忽略这些警告
|
||
1. 打开 TWLMenu++ 设置
|
||
1. 切换到 `Misc settings`(杂项设置)页面
|
||
1. 打开 `Slot-1 microSD access`(Slot-1 microSD访问)
|
||
1. 按 `B` 键退出 TWLMenu++ 设置
|
||
- 如果您最后进入的是 DS 经典菜单,请再次按 `B`
|
||
|
||
#### 如果您没有 R4(i) Ultra
|
||
|
||
1. 在 `sd:/_nds/`(不是烧录卡的 microSD 卡)中创建名为 `primary` 的文件或文件夹,以便 TWiLight Menu++ 启动烧录卡后从主机的 SD 卡读取设置。
|
||
1. 要使用烧录卡固件运行游戏,请从[本指南](installing-flashcard)的`自动启动TWiLight Menu++`章节开始阅读
|
||
1. 将 `BOOT.NDS` 文件从 `TWiLightMenu-Flashcard.7z` 复制到烧录卡的 microSD 卡根目录。
|
||
1. 打开 TWLMenu++ 设置
|
||
1. 切换到 `Misc settings`(杂项设置)页面
|
||
1. 打开 `SCFG access in Slot-1`(注意,该选项会覆盖 `SD access in Slot-1`)。
|
||
1. 将 `Slot-1: Touch Mode` 设置为 `DSi 模式`
|
||
1. 打开 `Auto-start Slot-1`
|
||
1. 按 `B` 键退出 TWLMenu++ 设置
|
||
- 如果您最后进入的是 DS 经典菜单,请启动烧录卡
|
||
- 否则,重新启动 TWiLight Menu++
|
||
|
||
#### 在 SD 卡和烧录卡内容之间切换
|
||
- 按 `SELECT`+`↑` 或 `SELECT`+`↓` 在 SD 卡和烧录卡内容之间切换
|
||
- 如果启用了 SELECT 菜单,也可以在该菜单中进行操作
|
||
- 如果使用 3DS 主题,请点击游戏卡/SD 卡图标
|
||
- 如果使用 R4/GBC 主题,请按 `L` 键
|